Tuesday, December 22, 2009

Part 11 - Soffit and Stuff

Progress continues as we now have a completed roof and most of the soffit in place. The windows will be here soon which should keep out the cold a bit better than the plastic that's covering the openings right now. Here are some updated photos:


The crawl space is insulated. It should be nice and warm for the furnace guy to run the duct work.


The photo above is a shot of the entry way leading into the mud room. A few more walls and we'll be ready for the sheetrock between the garage and the house.


Add Image

Delta Pilar Touch-Activated Faucet Giveaway

If you are like me and are interested in all things home improvement related then check out the Home Construction and Improvement Blog. It's a great resource for product reviews and home construction tips.

They are currently giving away a cool Delta touch activated faucet. Follow the link below to enter:

Friday, December 11, 2009

Part 10 - The roof is on (mostly)

Last weekend my brother and I got educated in working outdoors in Minnesota in December. On Saturday morning it was -2 degrees when we headed out to work on the house. Despite the cold, we were able to get a lot accomplished. By Monday evening we had the roof sheeted on the house, and the garage walls and the trusses were in place.

I'm really happy with the final interior layout. The vaulted ceiling in the living room really opens it up. My dad made some last minute adjustments to the bathroom layout and it turned out great. Considering the size of the house, the rooms are large and there's a lot of closet space. The garage door and windows are on order, so it won't be long because we can seal it up.

In the pictures below you can see that the garage trusses are in place. We still need to tie the garage roof into the main house.


The living room window isn't visible in the picture below because it's still covered with oxboard.


This is a view from the living room toward the back bedrooms. The bathroom is the first door on the left.

In this picture you can see the vaulted ceiling. The window on the right is in the dining room. The window on the left is one of the two windows in the living room. The door in the front entry to the house.


Tuesday, December 1, 2009

Part 9 - Exterior Walls

During the holiday break we were able to finalize a few design decisions. After looking at a couple of model homes, we finally made our siding and window color selections. We will be using JamesHardi HardiPlank fiber cement siding on the exterior of the home. To give the building some contrast we'll be using HardiShingle on the gable ends. We opted for a lighter siding color
(Khaki Brown) with darker gables (Timber Bark). The trim will be an off white color (Navajo Beige). We'll be using Pella clad windows, and the window color should match the trim nicely.

We also went back and forth about the fireplace location in the living room. After much debate, we settled on the original plan of a corner fireplace. The corner fireplace allows us to keep our preferred window locations and it doesn't take up too much precious living space.

After Thanksgivings, Doug and Dad were back to work. The weather was in the mid twenties, and the forecast calls for low twenties and snow the rest of the week. The goal is to have the roof on by the end of the weekend. I'm sure they will appreciate being able to work inside.

Since the last post, the foundation was backfilled and two small retaining walls were installed around the entry to the crawl space. The exterior walls were framed and sheeted, and they started laying out the interior walls.

Here are some updated photos:

In the photo above, Dad is laying out the interior walls. The view is from the back bedroom looking toward the dining room. The door on the right has been framed in for the future master bedroom. Initially this will get framed over since we aren't doing the master suite right away. For now it makes a nice door to the side of the house. You can also see the kitchen and bathroom windows in the right side of the shot.


Here's a view of the dining room from the side of the house. This doorway will get closed off eventually.


This is a view of the back of the house. What looks like a doorway is actually the guest bedroom window. The bottom of the window isn't framed in right now because it makes a nice door to the back of the house. You can see the retaining walls that lead to the crawl space. With the sandy soil the crawl space will be nice and dry all year round. It will make an excellent place for extra storage.

This is a view of the front entry to the house. There will be a small deck leading to the front door.

Sunday, November 22, 2009

Part 8 -The Floor is On

After a hectic week of work the building is capped off.

Here's a summary of what was accomplished this week. Pretty impressive:
  • Hole dug
  • Septic tank and drain field installed
  • Well drilled
  • Footings framed and poured
  • Crawl space framed
  • Basement beam installed
  • Floor joist installed
  • Floor capped off
  • Tar applied to exterior of crawl space
I'm sure that I'm missing a bunch of stuff, but that's a pretty nice list for the first week.


Friday, November 20, 2009

Part 7 - Framing

It's starting to look like a house. After cutting a million 2x6's to length, the crawl space is in place. I love this phase of the project when the look of the building changes dramatically every day. The forecast calls for snow on Monday, so the next week is going to be interesting. Getting the floor capped will be the next major milestone.


Wednesday, November 18, 2009

Part 6 - Progress

The well drilling began on 11/17. After drilling down 150 feet they weren't able to find any usable water. This was a surprise because there was a working well nearby that had been there for many years. Instead of trying to go deeper they started digging in a different location. At 100 feet they found a water source that was able to produce 30 gallon a minute. After plugging the old well and the 150ft dry well they were back in business.

The footings were poured on 11/18. They also buried the new septic tank and the drain field was installed and approved. They have made excellent progress in only 3 days!! Here are some more photos.


Part 5 - Construction Begins

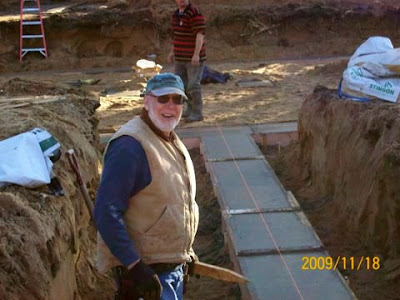
On 11/16/09 they dug the hole. The building site is pure sugar sand and the digging went smoothly.We had covered the ground with hay in hopes of keeping it from freezing too much. It must have worked :)

The guys also began setting up the forms for the footings. It was a very successful first day.


Part 4 - Paperwork

With a solid cost estimate in hand, the next step in the process was getting financing. Since we are building in Northern Minnesota it made sense to try to get financing from a local bank. Local banks are very familiar with local building codes and local contractors. You might not get the best possible construction loan interest rate, but be less of a headache than having to deal with an out of town lender. After talking with a couple of different banks we found one that was offering acceptable residential construction loan rates. Also, they didn't require a cash down payment since we would be using the land as collateral. The approval process was painless, and there wasn't an unreasonable amount of paperwork required.

At this point it was the middle of October. In Northern Minnesota it gets cold in November and we usually get snow at the beginning of the month. We needed to get the hole dug and concrete poured ASAP. Before we could dig we still had a bunch of paperwork that needed to completed.

  • Survey
  • Administrative subdivision approved by the county
  • Appraisal
  • Title Search
  • Liability and Builder's risk insurance in place

The survey was on the critical path and unfortunately the survey company told us that it was going to take 2 weeks before they could get started on it. We waited patiently and the survey was eventually completed at the beginning of November. We now had a 7.84 acre of parcel of land to work with. Luckily the weather was mild during this time. It took an additional week to get the rest of the paper work completed, and on Friday Nov 13th were finally ready to close. Everything went smoothly at closing except that there was a small tax lien against the property. It turned out to be a mistake, and we were able to close as scheduled. Arrangements were made to start digging the hole on Monday.

Part 3 - Estimating costs

With a house plan in place the next step was to figure out how much it was actually going to cost to build. Sorry, but I won't be including any actual cost figures in my posts. My father had recently built a house with a similar floorplan, so he had a pretty good idea of what the labor\materials would be. To nail down the numbers, we collected bids from the various subcontractors and the lumber yard.

Here's a breakdown of the major items:

  • Land survey to subdivide the property
  • Foundation\Dirt work
  • Well\Sewer
  • Heating\Cooling
  • Electrical
  • Plumbing
  • Windows\Doors
  • Construction materials (concrete, lumber, siding, trim, roofing, etc)
  • Cabinets\Counter tops
  • Flooring
  • Drywall taping

My father and his crew will be doing the framing, drywall, finish carpentry, siding and roofing. My brother and I plan to put sweat equity into the home by doing the following without using a sub-contractor.

  • Low voltage
  • Painting\Staining
  • Hardwood\Tile installation
  • Landscaping

Once we knew the cost of building the home we needed to figure out how much we could expect to sell it for. We don't know if we'll be using a realtor to sell the house, so we opted not to bring one in to help us with an estimate. I started by looking at the MLS for comparable homes in the area. Unfortunately, there weren't a lot of comparables. The good news is that there isn't much new construction right now, so our property should compare favorably to many of the older homes on the market. Besides the MLS, Better Homes and Gardens http://www.bhgrealestate.com/ and http://www.zillow.com/ have some nice tools for estimating the value of homes in the neighborhood. The sites aren't perfect, but I found them to be useful in providing a variety of different information. After a lot of research we settled on a target sales price. After taking into account commissions, interest payments, closing costs and a potentially long selling cycle (9-12 months) we felt confident that the profit margin was large enough to pursue the project.

Tuesday, November 17, 2009

Part 2 - Floor Plan

Building a home with the intention of selling it for a profit is a major challenge in today's economy. Home builders are going out of business left and right and profit margins have shrunk dramatically over the past few years. The term "real estate investor" is a dirty word in the banking industry so getting financing can be a challenge. The one bright spot is that building materials are very inexpensive right now. Homes are selling for a lot less, but they also cost less to build. With of that in mind we set out to build a small home in hopes of minimizing our risk.

The decision of where to build was an easy one. My father will be the contractor so it needed to be close to his home in Northern Minnesota. My parents own 20 acres of land which we decided to subdivide for the project.

In order to keep the cost down we wanted the house to be ~1200 sq/ft. We wanted something that would make a nice starter home or possibly a vacation\retirement home.

We started with the floor plan of a home that my father built a few years back. We decided to keep the rooms large which meant that we could only have 2 bedrooms and 1 bath. One requirements was to lay it out in a way that it would be easy for the future home owner to add a master bedroom and 2nd bath at a later date.

After numerous revisions we finally settled on a plan. It's a 2 bedroom, 1 bath rambler with a side entry attached garage. The house is 28'x42' with a 24'x26' attached garage. The house ended up being 1204 finished sq/ft. I'll be outlining the interior\exterior details in later posts as the project progresses. Unfortunately the image below is very small, but it gives you a general idea of the layout of the home.

Part 1 - Building a second home

I've been fascinated with houses most of my life. My dad is a Carpenter\Contractor and he has worked on some facinating projects over the years. One of the houses he build was featured in Better Homes and Gardens magazine in the 1980's. At the age of 13 I started working with my father in the summer. It was a great summer job, and I learned many valuable skills. I worked with my Dad for 8 summers until I started working full time as an Electrical\Software Engineer in 1997. Since then I've owned three different homes (2 were new construction) so I've had plenty of opportunities to apply what I learned on various projects around the house.

This summer my dad asked my brother and I if we would be interested in building a small house as an investment. I was immediately interested and I wasn't able to stop thinking about it. We recently started the project, and I'll be documenting the progress in a series of blog posts.

Tuesday, August 4, 2009

Sirius STARMATE 5 Radio


Who doesn't love satellite radio? CDish quality sound, a bazillion stations, and no need to change the channel when you travel from city to city. I like it so much in my car that I decided to buy a radio for the van. Since the van already has a decent infinity stock stereo I opted to buy an external Sirius tuner. After reviewing the limited number of choices I settled on the Sirius STARMATE 5.

The radio has a few really nice features. First and foremost it supports A LA CARTE programming. It's one of the only radios that does. That means that if you don't want to pony up for a full subscription you can pick your favorite 50 channels for a discounted price. This option is nice unless you really want live NFL games because they aren't included in the package. The other nice feature is Pause\Rewind\Fast Forward. The pause buffer will store 44 minutes of music. It's really nice if you want to replay the same song over and over again for your kids or your wife wants to talk to you while there's something good on the NFL channel. I'm surprised that there aren't more radios that offer this feature.

And now my gripes begins...

Since it's an external radio you need to figure out a way to connect it to your primary stereo. The STARMATE 5 supports the following external connections:
  • Aux input - Best available sound quality but unless you have an aftermarket deck or a 1-2 year old car you probably don't have an aux input.
  • Cassette Adapter - Why do cars still have cassette decks anyway? It just so happens that the cassette deck stopped working in my van 1 week before I bought the radio.
  • FM Modulation - Good idea, crappy in real life. If you live in a major city then pretty much every frequency is taken up. Driving from city to city requires you to tune a different freqency.
  • FM Modulation with external antenna - Same concept. Unless you can find a wide open frequency you are going to get interference
I ended up going the FM Modulation route (for now). It sounds like hell, but without replacing my deck I don't have any other options. If only this thing supported the Bluetooth A2DP profile then I would be all set. If it play music then it should have Bluetooth.

Good:
  • A LA CARTE programming
  • 44 minute music buffer
  • Intuitive UI
  • Looks cool
  • Portable-ish (I can use it at home with the appropriate dock and antenna)
Bad:
  • Requires 3 cables for the best quality sound (satellite antenna, power cable, stereo out cable)
  • No Bluetooth A2DP profile
  • No Bluetooth A2DP profile ..
  • No Bluetooth A2DP profile ...
  • No Rechargeable batteries. I hate having to run power to the unit.
All in all it's a good unit especially if you have an aux input available. I wonder who Gill Brandt is interviewing right now on the NFL channel.

Sunday, August 2, 2009

Windows Home Server (Acer Aspire AH340)


If you are like me then you are really bad at backing up your computer. Except for financial information I've never had much on my PC that was worth backing up. Now that we have kids things have changed. My wife takes several GB worth of pictures and video every few weeks. Losing these would be unthinkable. Up until now our backups mainly consisted of a handful of DVDs and an assortment of images that were been uploaded to the various photo hosting sites. After a recent scare with my PC I decided to bite the bullet and buy a Windows Home Server (WHS). In general I'm not a huge fan of Windows, but I've read good things about Windows Home Server. My goal was to find a unit with a dedicated processor and expandable hard drives. I didn't want to build my own box, so the Acer Aspire AH340 fit the bill nicely.

The unit includes a 1.6Ghz Atom Processor, 2GB of RAM and a 1TB drive. I added an extra 1TB drive right away for a total of 2TB. It will hold a total of 4 SATA hard drives and 3 of which are hot swappable. The unit also includes 5 USB 2.0 slots and 1 eSATA port for additional external drive expansion. With gigabit Ethernet transferring files to the server is extremely fast.

I currently have the WHS configured to automatically backup my Windows 7 PC and laptop daily. It was a breeze to setup and everything worked flawlessly out of the box. For most people the WHS console is adequate for performing common tasks. If you want to install additional services like Orb for instance then you can login using remote desktop. You are then presented with a bare bones UI reminiscent of Windows NT.

I'm primarily using the WHS for the following functions:
  • Automatic PC backups
  • Web Domain. The WHS allowed me to easily create a domain so that I can access the server from the internet. That's convenient for uploading and downloading files when you are away from home.
  • Audio\Video streaming. I installed Orb on the box so that I can stream audio\video to my iPhone.
  • Tivo spoofing. I installed pyTivo which allows me to view video on the WHS from my TivoHD.
Features that I'm not currently using:
  • iTune server. You can configure the WHS to be an iTunes server which is great if you want to host all of your audio\video from one primary location.
  • Offsite storage. The WHS provides a feature where you can plug in an external hard drive and backup the WHS. That's a great option if you want to store a drive in a fire proof box or at an offsite location.
All in all I'm very pleased with the unit. It sits out of site on my server rack and I let it worry about backing up my computers. The added features are simply icing on the cake.

Pioneer Elite BDP-05FD Review


The BDP-05FD isn't my first Blu-ray player. I was previously using a Samsung BP-P1500. I liked the Samsung alright except for one major issue. For some reason it refused to stay on 1080i output mode, so every few days it would switch to 1080p/24 which unfortunately isn't supported by my video processor. When that happened I would be stuck with a black screen and no way to easily change the resolution. This glitch was motivation for me to buy a new player. My receiver and video processor are both getting long in the tooth and neither one supports HDMI audio. With this in mind I decided to buy a player with 7.1 analog outputs. I was quickly able to narrow my choices to the LG BD390, Oppo BDP-83 and Pioneer Elite DBP-05FD. A few month back I was browsing the Ultimate Electronics ad in the Sunday paper and I noticed the Pioneer on sale for $299. I figured it had to be a misprint and they really meant the Pioneer BDP-51FD. I went to a local store and to my surprise it was actually the BDP-05FD that was on sale.

The Pioneer is an upgrade over the Samsung is almost every way. The exception being load times and the lack of an Ethernet connection. The only time I used the Ethernet port on the Samsung was for firmware upgrades. Ethernet a nice feature, but I don't mind burning an iso image every 6 months or so to upgrade.

What can I say about the 7.1 audio outputs. I've never been much of an audiophile, but I can definitely notice a big difference using the analog outputs vs a low bit-rate optical output. I was skeptical how much better a DTS-HD MA track would sound versus standard DTS. To my surprise the audio is much more dynamic and I find my self messing with the volume control a lot less that before. The only downside is that even with the gain cranked up I need to have the volume turned up really high to achieve a reasonable listening level. That's a problem when I switch back to the Tivo and I almost blow out the speakers. I'm not sure if this is a function of the analog outputs or the player in general. I'll be curious to try out HDMI audio as soon as I upgrade my receiver.

The user interface is also very nice. The menus are well laid out and there's a resolution button on the front on the unit (yeah!). This is a great feature for quickly switching between output resolutions for testing. When you change the resolution the OSD also shows the native resolution of the source material which is really cool. The build quality of the unit is also top notch. The size and weight of the unit resemble a receiver more than a Blu-ray player. The capacitive touch screen is also very responsive and the unit has very clean lines. I'm not a huge fan of piano black, but that's probably because the rest of my gear is flat black.

The Blu-ray playback is rock solid. The supported output resolutions are the usual suspects: 480i, 480p,1080i,1080p/60, and 1080p/24 (via source direct mode). 720p is unusually absent from the list. There are still a large number of 720p displays around (including mine) so I was a bit surprised to see that 720p was missing. In my case I have the player output 1080i and I let my video processor down-convert to 720p since it does a stellar job. DVD playback is on par with the Samsung, but I let my video processor do the heavy lifting anyway.

The Wolfson DACs do an excellent job with CD's as well. Unfortunately my sorry Polk in-wall speakers don't do this player justice.

To summarize:

Pros:
  • Excellent build quality
  • Classy design
  • Solid UI
  • Top notch Blu-ray playback
  • 7.1 analog outputs with support for every HD audio format
  • Beautiful CD playback
Cons:
  • No Ethernet port
  • No 720p output mode
  • Sluggish load times
The BDP-05FD is easily the best $299 that I've spent on AV gear in a long time.


My Gear

Since this if my first post I thought it would be appropriate to provide a list of my equipment. I'll post some pictures once my wife's digital SLR gets back from the shop. I don't think iPhone photos are going to cut it.

Living Room:
  • Optoma HD7300 Projector (720p Dark Chip3 DLP)
  • Samsung SyncMaster T220 LCD monitor
  • Draper Silhoutte 106" electric tensioned screen
  • Rumark RC8 Power Conditioner
  • Pioneer Elite BDP-05FD Blu-ray player
  • Optoma HD-3000 Video Processor
  • TivoHD DVR
  • Pioneer VSX-1014TX receiver
  • Cerwin Vega LW-15 sub
  • Polk RC8 Ceiling speakers(2)
  • Polk RC85i In-Wall speakers(4)
  • Middle Atlantic rack
  • Custom DIY projector lift
Bedroom:
  • Olevia 532-B12 720p LCD
  • Toshiba HD-A2 HD-DVD player
  • Linksys DMA2100 media center extender
  • Yamaha RX-V493 receiver
  • Infinity Video1 center channel speaker
Basement server room:
  • Media Center PC (Windows 7)
  • Hauppage WinTV-950q ATSC/NTSC/QAM Tuner
  • Acer Aspire EasyStore H340 Windows Home Server (2 TB)
  • Gigabit networking gear
  • Server rack